Thursday, June 30, 2011
Carol Burnett - Bust Ups, Bloopers & Blunders Pt.1 HQ
I just had to share this one....I love this show and it just looks like they had so much fun on the set.
Advice Needed Please!
 2010 Designer's Choice Fashion Preview Show
Esque- Leslie Pennel, Designer
I'm the type o f person that hates to ask for help. Maybe it's because I feel like I'm imposing or that I'll be bothersome, but this whole pattern drafting and construction gets really confusing. Well, each year I attend a fashion show here in my town that features local clothing and jewelry designers. Last year a designer named Leslie Pennel showcased her line and I fell in love! Check her out at http://www.facebook.com/#!/esquedesign . I couldn't wait to come home and look her up on Facebook. I didn't want to seem stalkerish, but I had to ask her questions and she was very kind with her responses. She helped make sense of some of the stumbling blocks I'm encountering. I'm grateful for the advice given. Well, it's noon and I've yet to head out and run my errands. I'll head out in this HEAT and will hopefully work a bit more on this drafting when I return. Today I want to at least complete the basic bodice/sleeve/skirt fit dress. I'm still also determined to clean out this garage before the weekend too, ugh. I may have to put this drafting down for a couple of days and get this garage cleaned.
Carol Burnett - Q & A (Questions & Answers) Tarzan Yell
It's funny how certain things that I remember loving as a child I realize now in my adulthood. I used to love watching the Q & A segment on the Carol Burnett show admiring the clothes she wore. Looking at it now as an adult, the clothes were always well constructed and very flattering on her. Now some of them are a bit dated by today's standards, but quite a few are classics. Bob Mackie designed all her clothing and skit costumes during the entire 11 season run of the show and he was amazing!
Wednesday, June 29, 2011
Try Again.
 The improper fitting of my basic fit block really had me discouraged. It was so tedious and time consuming, and when didn't fit properly I was ready to give up. My sleep schedule is so thrown off and the fact I haven't been to the gym this week doesn't help either. I did go to Hancock Fabrics today to purchase more muslin so I'm going to rework my measurements and draft it again. I'm going to leave it alone for a day so I can catch up on some things like clean my garage, school shop, register my son for school, go to the gym, do some laundry, etc. so I don't fall so behind on that.
When my basic block is done, it's supposed to look like the pictured pattern above. It's just a basic dress...a foundation to build any garment. ******sigh****** I'm trying to stay encouraged.
***Sigh*** Back to the Drawing Board

 The basic block bodice was very ill fitting so I'm going to have to recheck my measurements AND redraft the back and front bodice in order to achieve a proper fit. I don't know what the heck happened at my neckline. The waist was way too snug as well. I must've fudged a bit when I recorded my waist measurements. I stitched the sleeves, but haven't had the chance to baste, ease, and attach them on the garment. I think the sleeves will be okay. I have no clue about the fit of the skirt because I ran out of muslin and will have to purchase more. I know this is a learning process, but I can't afford to make too many mistakes.
Talk about Tedious...
 Tools used to draft my basic measurement blocks: pattern drafting paper, paper french curve, pattern making textbook, vary from curve rule, pink pearl eraser, metal ruler, custom measurements, mechanical pencil
 from l-r sewing scissors, flex curve ruler, plastic french curve
 Basic Custom Block Draft (l-r sleeve, skirt front, skirt back, type 2 skirt back, front bodice, back bodice)
I'm convinced drafting the basic block pattern was the most tedious thing I've ever done. These basic block pieces are to serve as the foundation for anything I make. Having to draft and mark my precise body measurement to the nearest 1/8th of an inch was mind boggling. I hope I'm not going about this the long way, but something tells me knowing how to do this will be beneficial. I gotta admit that I'm quite fond of all the odd shaped sewing tools and supplies used to draft and measure the patterns. I'm still figuring out the sleeve fit and adjustment chapter here in this textbook and ready to call it a night (so sleepy)! I'll read just a bit further and will head to bed.
It dawned on me that I report to work in 1 month and still have so many other loose ends that I will need to tie up. I've given myself 2 weeks to try and complete my dress which would be great b/c Little Rock Fashion Week will falls on that 2nd week. I would love to wear it when I support my sweet friend Sheila who will be showcasing her line!! Check her out at http://www.ncholeferoce.com/
! I'm really excited for her too! We'll see how much progress I make here in the upcoming weeks because I've gotta keep things moving and prepare for this upcoming school year PLUS a state classroom observation as well. I'm so grateful to be home for summer break.
Sunday, June 26, 2011
Making Sense of Pattern Grading
 Link ---> Making Sense of Pattern Grading - Threads
Pattern Grading (proportionately increasing or decreasing a pattern's size) is another technique that has me a bit worried, but I know I'll be able to cross that bridge once I get there. --Trying to convince myself there will be no worries... ;-)
Finished Tunic...and Moving Forward!


Well I finished the tunic and glad I did it as a practice refresher. I still have a ways to go as far as learning, but I managed to pick up a few techniques along the way. I've been thinking about the best way to start my first project and here's the game plan so far:
- Take my detailed body measurements
- Draft basic block patterns specific to my size
- Draft dress as a bodice/skirt combination and include the shoulder string tie-straps
- Draft the ruffles as a circle pattern
- Draft the skirt tiers
- Write out the detailed construction procedures similar to how it's written in a store purchased pattern envelope
- Construct on Muslin test fabric
- Construct on actual fabric

The more I look at my sketch, the more I want to modify the design. Instead of it being a tiered maxi dress, I'll let it be separates-- a bodice and short skirt and/or bodice and pants. In fact, I'll do a maxi skirt, short breezy skirt, pants and keep the same top. Yes!
Saturday, June 25, 2011
Draping Attempt

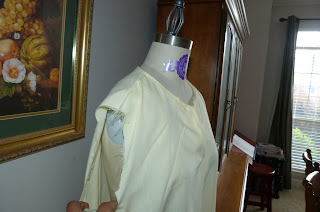
 I FINALLY finished the tunic and fairly pleased with how it turned out! It's such a simple look that it's hard to imagine it took me so long to complete it. I'll post a picture of myself wearing it later today. The excitement of finishing it made me want to get things started on the tiered maxi project. I'm very clueless on where to start aside from the sketchy guide sheet I jotted down (shown in my 3rd blog post). So, I found some muslin and attempted to drape the dressform based on the my sketch. Hmmmm.....it didn't turn out so great, but I had an interesting time attempting it. I used to play around with draping on miniture mannequins YEARS ago and remembered how much I enjoyed doing so. Doing it again brought back memories. The actual fabric that will be used is shown here below:
 It's a rich crimson color of some sort of cotton/poly blend with a crinkly texture. Looking at my sketch, I'm already thinking of some variations to make of this design! Loving this creative energy. Taking things one day at a time.
 Thursday, June 23, 2011
Sketcher's Block
 One of the reasons I chose a sketch from my 2010 portfolio as my first draft and construct project was because I've been dealing with sketcher's block. The frustration surfaced sometime last year and I finally became fed up from not knowing how to construct one of my sketched drawings! Losing the desire to sketch was a blow b/c it was something I had always enjoyed doing when I had the time. I loved how I went into some sort of "zone" when sketching. I even purchased a drafting table this year hoping it would inspire me to start back sketching, but that didn't help much either. I can honestly feel the block lifting and hopefully there will be some 2011 sketches to add to my portfolio.
Wednesday, June 22, 2011
Back in the Groove of Things
 My children, niece, nephew, and 1st cousins 6-15-11
Well, it made me miserable and I believe I was able to find the root of the problem. FACEBOOK and the smartphone Scrabble-like game WORDS WITH FRIENDS. I've been spending way too much time procrastinating with that. The minute I deleted those 2 accounts, I felt a sense of freedom. There were still just a few challenges b/c I have family obligations, but FB and WWF really caused me to be unproductive. Making a master task list of things I need to do while off on summer break made me feel less overwhelmed as well. I want to enjoy this short time I have off from work, and the only way I can do so is to manage my time. Take a look and see what I've done this evening on my tunic:
 I know it doesn't look like much, but putting those sleeves in was a beast! I guess it was so b/c I haven't sewn in over 15 years and that was only my 2nd time doing so. I kept having to read and re-read the instructions. Another thing I learned to do was do a blind stitch hem on the sleeves. I had to pray for comprehension while reading those instructions and looking at the illustrations. Overall, I'm happy with how things turned out. I have to admit while attaching the sleeves to the garment, I told myself that this would only be a practice garment. When I tried it on, I was actually impressed b/c it was a fairly decent fit. I would've never thought such a simple looking garment would be so challenging, but practice makes perfect. I'm glad I chose it as my first practice commercial pattern project. I have a busy day ahead of me tomorrow, but I hope to attach the other sleeve and hem the edge. If so, I'll take a photograph of me posing in the completed garment. I'm so ready to start on my official project!!
Thursday, June 16, 2011
About Face

I was a bit anxious about drafting and applying facings to garments. The purpose is they finish off openings like sleeveless shirt armholes, necklines, the inside of pants like the one pictured, etc. I wanted to understand how to apply them because they give garments a more professional finish. I found an awesome article and a step by step tutorial here http://www.bellaonline.com/ArticlesP/art22861.asp and here http://www.godsavethequeenfashions.com/Facing_your_Garment.html . So no anxiety and I'll be ready to cross that bridge when I get there.
Philippians 4:6-8
Be anxious for nothing, but in everything by prayer and supplication with thanksgiving let your requests be made known to God. And the peace of God, which surpasses all comprehension, shall guard your hearts and your minds in Christ Jesus. Finally, brethren, whatever is true, whatever is honorable, whatever is right, whatever is pure, whatever is lovely, whatever is of good repute, if there is any excellence and if anything worthy of praise, let your mind dwell on these things.
Monday, June 13, 2011
Progress
 Simplicity Pattern 4149
 My Serger and Sewing Machine
Well I did more than anticipated today and moving closer towards finishing this tunic. I knew I was working on this garment mainly for practice, but I was actually hoping to possibly wear it. I dunno. We'll see how it all turns out. Today I worked on the sleeves and finished the raw seam allowances. I'm becoming more and more comfortable with my sewing machine and serger and I've affectionately named Margarita and Beulah LOL! Okay, the next challenge will be to attach the sleeves. I had to pray to comprehend the simple stitching of the sleeves, but now I will need to pray for comprehension when I actually attach and ease them into the armholes here in the next day or so. Here's what I'll have to decipher:
Step 1
Turn sleeve RIGHT side out. Hold garment WRONG side out with armhole toward you. With RIGHT sides together, pin sleeve to armhole edge with center small dot at shoulder seam, matching underarm seams and remaining small dots. Pull up ease stitches to fit. To distribute fullness evenly, slide fabric along bobbin threads until there are no puckers or tucks on the seam line. Baste. Stitch. Stitch 1/8" (3mm) from first stitiching. Trim seam below notches close to stitching. Press only the seam allowance, shrinking out fullness.
Turn sleeve RIGHT side out. Hold garment WRONG side out with armhole toward you. With RIGHT sides together, pin sleeve to armhole edge with center small dot at shoulder seam, matching underarm seams and remaining small dots. Pull up ease stitches to fit. To distribute fullness evenly, slide fabric along bobbin threads until there are no puckers or tucks on the seam line. Baste. Stitch. Stitch 1/8" (3mm) from first stitiching. Trim seam below notches close to stitching. Press only the seam allowance, shrinking out fullness.
Step 2
Press up hem. Press under 1/4" (6mm) on raw edge. Stitch hem in place. Press under 5/8" (1.5 cm) on slit opening edges. Pres under 1/4" (6mm) on raw edge; stitch, squaring stitching above opening.
What the what??!! It somewhat made a bit of sense being that I've done this only a couple of times long ago. I'm having fun with this, but Lord help me please.
Friday, June 10, 2011
Official Project #1 Tiered Maxi Dress


My first attempt will be this tiered maxi summer dress I sketched last year. I notated on the second sheet a brief guide summarizing details of the dress. This sketch was chosen because it appears fairly easy. Yes, I really have no clue what I am doing, but I'm going to pray for direction so we'll see how goes. I'll have to comprehend on how to draft the pattern and construct the thing, but I'm determined i'll figure this out.
Practice, Practice, Practice

I've been working on this Simplicity Pattern # 4149 for what seems like forever. I'd been busy with my family and work that I didn't have much time to devote to finishing the darn thing. I'll have a little bit more free time (that word doesn't really exist in my world) seeing that we're ending the school year. I'll have 7 weeks off for summer break so we'll see how all goes! I'm only making the tunic (with sleeves) so hopefully I'll be finished here within the next week or so. My construction skills needs some work. **Random thought-- Thinking about purchasing a rotary cutter. Here's what I've done so far....

Thursday, June 9, 2011
MISSION: Draft and Construct

Hello! I decided to start yet another blog. This time I'll be documenting my journey as I learn pattern making and clothing construction based on my own original sketches. I wanted to cut right to the chase by posting a picture of the first sketch I wanted to draft and construct, but I'm having problems with my scanner. Will try to do ASAP. This will be an interesting journey and it's such a long time coming so stay tuned!
Subscribe to:
Comments (Atom)